
I said it before and I'll say it again: I hate working on user interfaces. It's not the interfaces themselves, it's the code behind them that drives me a little crazy. Behind most user interfaces is an ad hoc tangle of features layered on top of other features that I would call byzantine except that would be an insult to the hardworking builders of the Byzantine empire.
In that last article I talked how we can avoid much of the pain by building our UIs on top of a state machine. In this article I'm going to take you through an example of how to apply this technique to building simple login UI. We're going to use Clojurescript and, since this will be a React app, we'll use Re-frame. If you haven't used Re-frame, don't worry, there's not that much to it and we'll be sticking to the Clojure idioms you are already using.
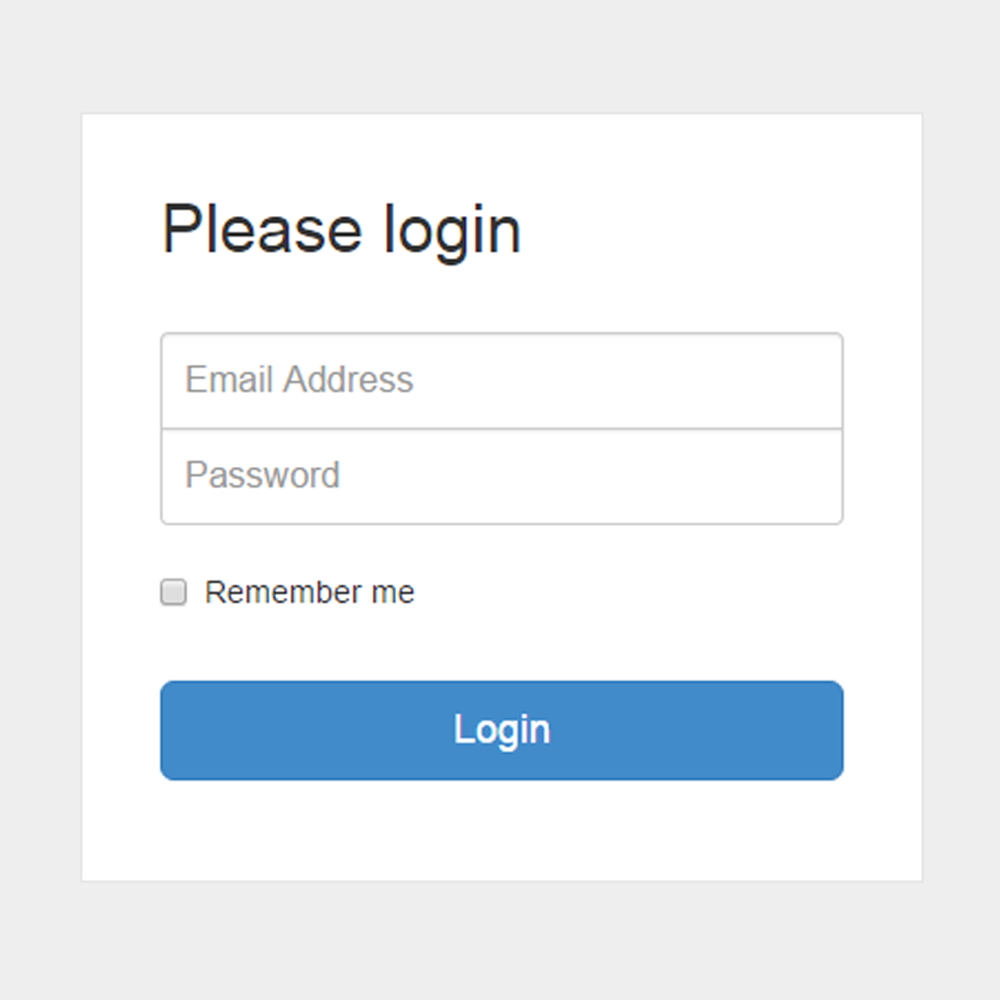
The example we'll be working with is a simple login UI. Let's assume the usual rules apply. The email and password fields can't be blank. Show one error message at a time. And disable the login button if an error message is visible.
The traditional sequence for building a UI is to start by writing some code to render things on the screen. We throw up some buttons, drop-downs, lists and then compose them into views. Once we have enough of this rendering code in place, we wire things together with events. And then, when we can't go any further, we add state. In other words, we build it from the bottom-up.
We'll take a different approach here. We'll do some top-down design before we write a line of code. We'll start by thinking about events and application states in order to rough out a high-level model using State Transition Diagrams.
It's tempting to try to list out all of the UI's states then connect them. We're not going to do that. We're building a UI and UIs are event-driven. We know from the previous article that we want user actions (and system events) to become the transitions of the State Transition Diagram. So we'll start by walking through each of the things the user can do and discovering all of our UI's states as we go. As each new state is discovered, we'll add it to a table which describes it.
We can kick things off by noting that UI starts out with all of its text fields and buttons enabled. We'll name that state Ready, and make it our starting state.
State | Error Message | Login Button
------+---------------+-------------
Ready   ""              Enabled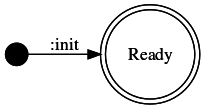
So far so good. Now let's add the first transition to our model.
There's really only two things the user can do from the Ready state: type some text into a field, or click the Login button. First the button click: We'll call this action click_login_button. The result is to display the error "email required" and to disable the Login button. Since our UI's appearance has changed, that means we've moved to a new state state, which we'll call Email_Required. So we add the details about Email_Required to our table, and to our State Transition Diagram.
State          | Error Message   | Login Button
---------------+-----------------+-------------
Ready            ""                Enabled
Email_Required   "email required"  Disabled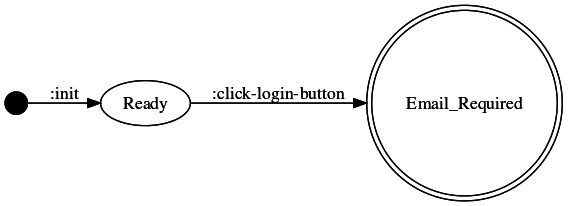
Next let's think about what the user can do from the Email_Required state. Since the Login button is disabled, the user's only options are to either enter an email or a password. At this point, nothing interesting happens if they change the password, so we'll ignore it. However, if they enter their email, we need to clear the "email required" error message. We'll call that action change_email. Since there's no longer an error present, we can re-enable the Login button. So our UI's appearance changes again, back to what it looked like in the Ready state. Once again, let's update our State Transition Diagram. Since we've returned to the Ready state, we don't need to add anything to the state table.
State          | Error Message   | Login Button
---------------+-----------------+-------------
Ready            ""                Enabled
Email_Required   "email required"  Disabled
I'm not going to drag you through the entire exercise, but let's do one more transition.
Back in the Ready state, our email field now contains some text. If we click that irresistable Login button again, the rules say that since the password is blank we need to display a "password required" error message, then disable the Login button. We'll call our new state, Password_Required, and we'll call this action click_login_no_password. This also seems like a good time to rename our other actions to make them more specific:
State            | Error Message      | Login Button
-----------------+--------------------+-------------
Ready              ""                   Enabled
Email_Required     "email required"     Disabled
Password_Required  "password required"  Disabled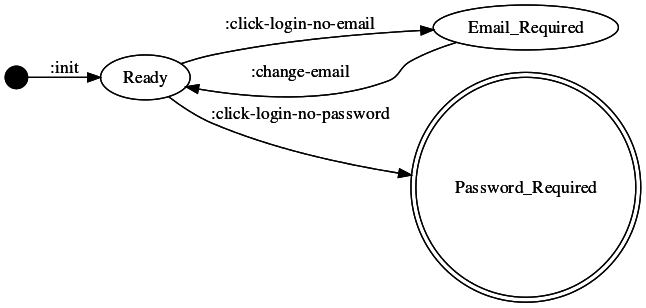
I'll leave the rest as an exercise for the reader (or you can just read down a couple of paragraphs) but I think this is enough to get the idea. The lesson here is that building up a State Transition Diagram incrementally helps you vet your requirements up front. It also helps surface UX design questions early. Even better you're able to construct a fairly complete model of our UI before getting bogged down in code.
Once you have the state table and transitions diagram, translating it into code is straightforward. Here's the final table and diagram:
State            | Error Message        | Login Button
-----------------+----------------------+-------------
Ready              ""                     Enabled
Email_Required     "email required"       Disabled
Password_Required  "password required"    Disabled
User_Not_Exist     "user does not exist"  Disabled
Invalid_Password   "invalid password"     Disabled
Loggin_In          ""                     Disabled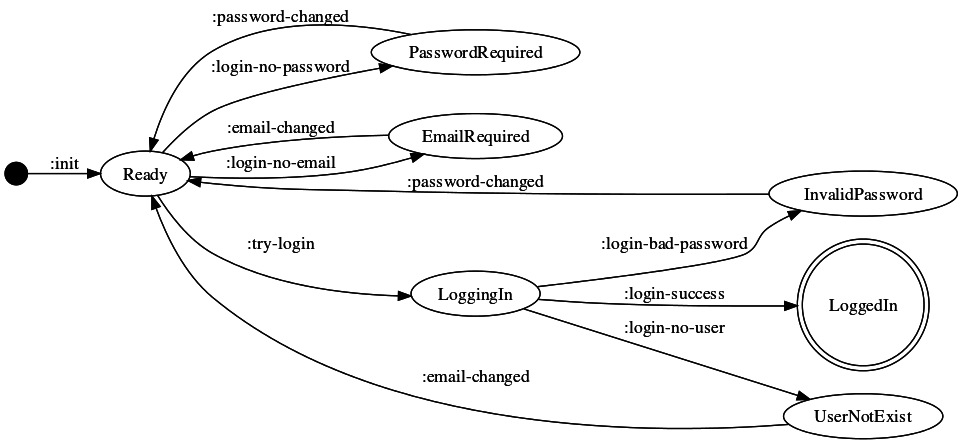
The State Transition Diagram can be represented using simple Clojure data literals.
{nil                {:init               :ready}
 :ready             {:login-no-password  :password-required
                     :login-no-email     :email-required
                     :try-login          :logging-in}
 :logging-in        {:login-bad-password :invalid-password
                     :login-no-user      :user-not-exist
                     :login-success      :logged-in}
 :email-required    {:email-changed      :ready}
 :password-required {:password-changed   :ready}
 :user-not-exist    {:email-changed      :ready}
 :invalid-password  {:password-changed   :ready}}
Before we dive into the code, here are a few things to keep in mind as you construct your own state machines:
Your first goal with this approach is building a useful model -- something that describes your UI at a glance. Beyond this size, you should consider splitting it up into multiple state machines. Generating a diagram from your state machine's data can help with this, but usually right around the time the code becomes hard to read, so does the diagram.
You don't need to create one state machine for your entire UI, or even a single view. For example, if your UI has a user profile page which lets the user update their mailing addres in one pane, and notifications settings in another, you'll probably want to separate your state machines similarly. We'll go into more depth on this in a future post.
You probably won't have a transition in your state machine for every Re-frame event in your UI. That's ok. For example, a button click event might not have a transition in your state machine, but its event handling function could contain conditional logic to perform a :submit-form transition if form validation succeeds.
As I say, our implementation will be based on Re-frame, a Clojurescript library for building React applications. While the FSM approach will work with any library or framework it fits Re-frame's data oriented design well. For a proper introduction to Re-frame, check out Eric Normand's guide. We'll quickly cover the very basics here. Re-frame applications consist of rendering functions, events, and subscriptions used to query application state.
All of Re-frame's application state is stored in one place using a single Reagent atom. Any changes to that atom will trigger a render. Rendering in Re-frame is done just as you'd expect: you use pure functions to produce a representation of the DOM using Hiccup data.
(defn comment
 [comment]
 [:div
   [:span (:text comment)]
   [:span (:author comment)]])
Re-frame's subscriptions API lets you expose a particular slice of app state to a component. The comments component below will render whenever the data returned by the :comments subscription changes.
(defn comments
  []
  (let [comments (subscribe [:comments])]
    [:div (map comment @comments)])) ;; <- note you have to deref

(reg-sub
  :comments
  (fn [db _] (sort-by :date (get db :comments))))
Now for the fun part. True to its functional nature, Re-frame's essence is nothing more than a reduction. To compute the current app state, you reduce over any queued events by using their registered handler functions.
(reduce handle-event app-state event-queue)Where handle-event can be as simple as a pure function of app state and an event, returning a new app state.
(defn handle-login
  [current-app-state event]
  ...
  new-app-state)

;; Register event handler to a keyword
(re-frame.core/reg-event-db :login handle-login)
This looks eerily similar to a state machine's state transition function, which is a function of the current state and a transition (and the state machine itself), returning the next state.
(defn next-state
  [state-machine current-state transition]
  ...
  next-state)
To recap, our state machine is a map.
(def state-machine {nil         {:init               :ready}
                    :ready      {:login-no-password  :password-required
                                 :login-no-email     :email-required
                                 :try-login          :logging-in}
                    :logging-in {:login-bad-password :invalid-password
                                 ...}
                    ...}
With this in mind, a basic implementation of next-state is pretty simple.
(defn next-state
  [state-machine current-state transition]
  (get-in state-machine [current-state transition]))
update-next-state uses Re-frame's app state to keep track of the current state of our login state machine. handle-next-state is the last link in the chain, allowing us to do what we've been describing: treat Re-frame events as the transitions of our state machine.
(def login-state-machine { ... })

(defn update-next-state
  [db event]
  (update db :state (partial next-state login-state-machine) event))

(defn handle-next-state
  [db [event _]]
  (update-next-state db event))
The tiny amount of code it takes to adapt our state machine data to Re-frame's event handlers is an indicator of how naturally they fit together. As usual, Clojure's powerful data literals deserve a lot of the credit.
Now that we have our model in hand, we can switch back to some bottom-up coding. We'll start with a simple rendering function that knows nothing about events or app state.
(defn ui
  []
  [:div
   [:form
    "Email" [:br]
    [:input] [:br]
    "Password" [:br]
    [:input] [:br]
    "Password" [:br]
    [:input {:type "button"
             :value "Login"}]]])
First, let's take care of some basic plumbing and wire our inputs up to app state. This new rendering code for the email input refers to two new things: an [:email] subscription, and an [:change-email] event. The event should look familiar.
[:input
  {:value @(rf/subscribe [:email])
   :on-change #(rf/dispatch [:change-email (-> % .-target .-value)])}]
We'll register the subscription, to get email from app state.
(rf/reg-sub
  :email
  (fn [db _] (get db :email)))
And an event handler, to store email in app state.
(defn handle-change-email
  [db [_ email]
  (assoc db :email email))

(rf/reg-event-db :change-email handle-change-email)
After doing the same for our password input, let's wire up the button's click event.
[:input {:type "button"
             :value "Login"
             :on-click (fn [e] (rf/dispatch [:login-click]))}]

(defn handle-login-click
  [db _]
  ;; Noop, no chnage to app state.
  db)

(rf/reg-event-db :login-click handle-login-click)
Now we're ready to integrate our state machine. We'll start by adding logic to handle a blank email. So, we're interested in the transition from Ready to Email_Required, via login_no_email.
(defn handle-click-login
  [{:keys [email] :as db} _]
  (if (string/blank? email)
    (update-next-state db :login-no-email)
    db))
In other words, when the email is blank, all we have to do is advance our state machine using the appropriate transition. That's it! Actually, we can do a bit better. As with Redux actions, Re-frame's postition is that semantically useful, named events are a good thing. Some people feel this gets a little ping-pongy, but fine-grained events are great for traceability. They play well with debugging tools like Re-frisk, and facilitate time travel.
(defn handle-click-login
  [{:keys [email] :as db} _]
  (if (string/blank? email)
    {:db db
     :dispatch [:login-no-email]}
    {:db db}))

;; Register as a effects generating event handler
(rf/reg-event-fx :login-click handle-login-click)
(rf/reg-event-db :login-no-email handle-next-state)
To finish implementing the blank email validation, we've got to update our rendering code with logic to display the error, and disable the submit button when necessary.
(defn ui
  []
  [:div
   (when-let [failure @(rf/subscribe [:failure])]
     [:div {:style {:color "red"}} failure])
   [:form
    ...
    [:input {:type "button"
             :value "Login"
             :disabled @(rf/subscribe [:login-disabled?])
             :on-click (fn [e] (rf/dispatch [:login-clicked]))}]]])
We've added two new subscriptions: [:failure] and [:login-disabled]. This is another spot where this approach shines, because we're able to implement several subscriptions soley based on a single piece of data -- our state machine's current state. We don't need to complicate app state with multiple attributes to keep track of [:failure] and [:login-disabled], because we're able to derive their values from :state.
(rf/reg-sub
  :failure
  (fn [db _] (case (:state db)
               :email-required "email required"
               :password-required "password required"
               :user-not-exist "user not found"
               :invalid-password "invalid password"
               nil)))

(rf/reg-sub
  :login-disabled?
  (fn [db _] (not= (:state db) :ready)))
We can take this a step further and create a single, root subscription called [:state], then use it to implement the [:failure] and [:login-disabled?] subscriptions. Layering our subscriptions in this way lets us take advantage of Re-frame's subscription signal graph. Long story short, if :state doesn't change, neither of the two new subscriptions which depend on it will fire.
;; Top-level subscription
(rf/reg-sub
  :state
  (fn [db _] (get db :state)))

;; Depends on [:state] subscription
(rf/reg-sub
  :failure
  (fn [db _] (rf/subscribe [:state]))
  (fn [state _] (case state
                  :email-required "email required"
                  :password-required "password required"
                  :user-not-exist "user not found"
                  :invalid-password "invalid password"
                  nil)))

;; Depends on [:state] subscription
(rf/reg-sub
  :login-disabled?
  (fn [db _] (rf/subscribe [:state]))
  (fn [state _] (not= state :ready)))
Moving along in our state machine integration, let's add the logic which removes the "email required" error message. Here, we're interested in the transition from Email_Required back to Ready, via change_email. We've already got a handler for this event, so all we need to do is update it.
(defn handle-change-email
  [db [event email]]
  (-> db
      (assoc :email email)
      (update-next-state event)))
Again, we make use of our existing utility function to advance the state machine. Why didn't we dispatch an additional event in this case? The [:change-email] event is already represented in our state machine, and there isn't any conditional logic in the handler -- there's no decision to trace.
We'll stop there, but you can check out the complete code for the rest of the implementation, including how the AJAX call & related events are structured, and code to generate the state transition diagram image.
So that's how I approach building UIs with state machines: Start with some upfront design and then start coding. This process works for me and it might just work for you. But the real power of state machine based UIs is not really the process but the output. With a state machine based design you end up with a model -- the state machine itself -- that opens up all sorts of opportunities to test, to visualize, prototype, maintain and extend you application.